This Educational DIY Rainwater Collection System – All You Need to Know covers another rainwater system. I put together a DIY Rainwater Collection System this past weekend. It consists of an IBC tote, modifications to the downspouts and some 3” PVC. This post will explain all of the steps that were used in putting this system together. At the bottom of the article, I have links to the products I used in the project.
Want the Quick Version?
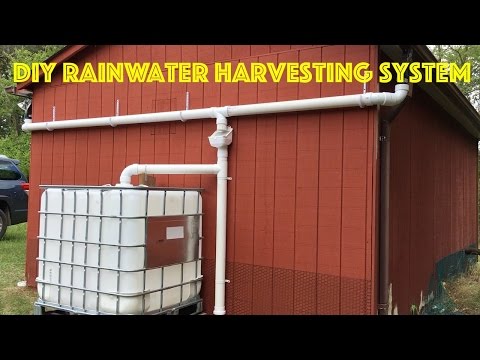
This is a very detailed explanation of the project including part numbers and places to buy them. If you want the quick version just to see what was done, go to the bottom of this post and look at the YouTube video titled “DIY Rainwater Collection System”.
How Much Water Will I get?
To figure out how much water you can catch, do the following calculation:
Square footage of your roof X the amount of rain X 0.623
An example is my roof on my metal garage is 1224 (51 long X 24 wide) square feet. If we get 3/4 of one inch of rain, the calculation would be:
1224 X .75 (or 3/4) X 0.623 = 571.9 Gallons of water from 3/4″ of rain
What about the Down Spouts?

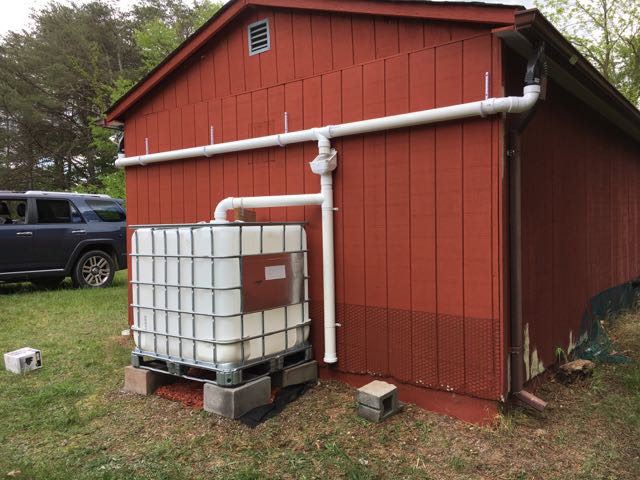
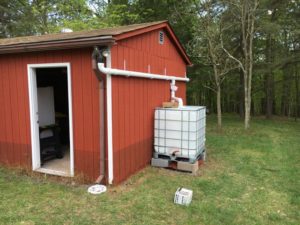
The first issue we had is the downspouts were facing the wrong way. By that I mean they were coming down on the front side of the garage and not the back side where we needed them. The fix for that was to to remove both gutters and downspouts completely and swap them. The gutters originally on the left side went on the right and the gutters originally on the right side went on the left. By making this swap, the downspouts were automatically moved to the back side of the garage. The picture titled “DIY Rainwater Collection System” shows the downspouts now in the back and the IBC tote in and leveled.
How about that IBC Tote
Where do you get that IBC tote from? I have found quite a few listed on Craig’s list. Just make sure they are food grade. Most of the Craig’s list adds don’t necessarily say food grade, so you will have to ask what was in them and make that determination for yourself. Many of them just had sugar water or something like that in them. What you don’t want is an IBC tote that had a bunch of weed killer in it and then go out and water your lawn with water from that tote. You’ll end up with a garden desert that nothing will grow in.
When getting an IBC tote, note that there are two different types of threads on the IBC tote valves. Some are fine threaded and are known as NPS female and work well with the 2” PVC threads, which is what I have. Others have coarse threads and are known as S60X6 and will not work with the threaded PVC pipe. See the link at the bottom of the article for different adapters.
There are different sizes as well. I have seen 275, 300, and 330 gallon totes offered on Craig’s list. It doesn’t really matter as long as you get a size that is good for you. I like the 300 gallon totes because I can fit 3 of them in my 10’ long trailer when I’m transporting them to the farm.
But the Ground Isn’t Level
We wanted the IBC Tote on the backside of the garage, but the ground wasn’t level. The solution here was to level the ground and then put some cinder blocks down and place the IBC tote on top of the cinder blocks. After the ground was level but before the cinder blocks went down we put down some weed cloth. Then the blocks were placed where they were going to go. You want to make sure all four corners of the IBC tote are on something firm, like a cinder block or wood or something that can support the weight. Then mulch was put on top of the weed cloth and around the cinder blocks. This will keep weeds from growing under the IBC tote where you can’t mow.
What about the seasons?
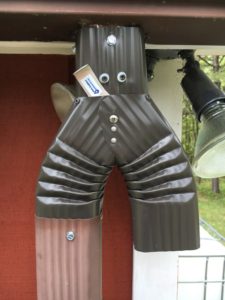
The next thing I did was put a Downspout Diverter from Aquabarrel in. The link for the product I used is at the bottom of the article. The downspout diverter is a “Y” connection on the downspout.
In the summer I will divert the water into the DIY Rainwater Collection System. In the winter it allows me to divert the water to a normal downspout to the ground so the water will not go in the DIY Rainwater Collection System. I need to do this up north because I go below freezing and need to empty all of the water out of the IBC tote so I don’t rupture the tote and the pipes when I go below freezing. People in the south that don’t get that cold will not necessarily need one of these.
The Diverter is shown both from a distance and close up in the pictures titled “DIY Rainwater Collection System Diverter In”. If you are going to purchase one of these, note that there are different colors to match your downspout and there are different size downspouts. The normal size downspouts for residences are 2×3 inch or 3×4 inch.
Keep the Leaves and Crap Out
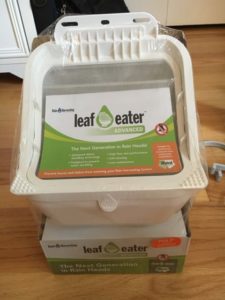
Before I forget, you want to keep the water flowing, so you need to keep the pipes from clogging. In the gutter system itself, we are using a gutter strainer. It is simply a galvanized mesh that goes into the downspout up in the gutter itself and prevents large leaves and branches from getting into the plumbing. From the downspout, or downspout diverter if you are using one, plumb/pipe over to our next filter device called a Rain Harvesting Leaf Eater.
This device filters out medium size debris that made it through the gutter strainer. This device is shown in the picture titled “DIY Rainwater Collection System Leaf Eater”. The 3″ pipe just open ended dumps into the top of the leaf eater. Any medium size debris hits the screen mesh on top of the leaf eater and just rolls off of it onto the ground. The bottom side of the leaf eater hooks up to another 3″ PVC pipe and takes the filtered water to the next step.
More Filter
The last line of filtering is to filter out the pollen and any other contaminants that come off of the roof when the rain first starts. I used a system I bought from Amazon called Rain Harvesting Downpipe First Flush Water Diverter Kit. This is a kit that needs a 3” vertical PVC pipe to go in.
The kit consists of a “T” connection, a ball seat, a sealing ball, a screw cap, a slow release control valve and a bunch of other stuff like brackets. The vertical PVC pipe has the “T” connection at the top with the ball seat and the screw cap and slow release control valve at the bottom of the vertical PVC pipe. The sealing ball is free in the PVC pipe between the “T” at the top and the screw cap at the bottom allowing the ball to float in the water as the vertical PVC pipe fills up.
The Parts
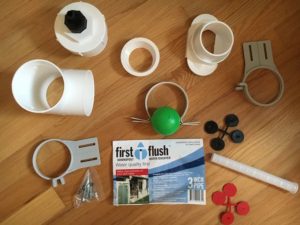
The parts that are included in the First Flush system is shown in the picture titled “DIY Rainwater Collection System First Flush”. Not all of these parts are used, but the kit offers lots of options with the parts included.
The majority of pollution, pollen, and other crap will come into the system with the first couple of gallons of rain. The idea is that the first couple of gallons of rainwater fills a vertical PVC pipe and traps all of the pollutants in the PVC pipe. There is a ball that floats on top of the water in the vertical PVC pipe and seals the pipe off after the vertical PVC pipe fills so the pollutants and “floaties” can’t get into your IBC tote. Once the PVC pipe is full, any additional water is diverted out the horizontal side of the T connection at the top of the PVC pipe and goes to you IBC tote.
Auto Reset
The slow release control valve at the bottom of the vertical PVC pipe is what makes the system automatic. It slowly releases water out a hole that is very small. It might take an hour or more to fully drain the vertical PVC pipe. Once the vertical PVC pipe is empty, it will catch the pollutants from the next rainfall. The bottom of the vertical PVC pipe has a screw cap so you can periodically empty the pollutants out of the pipe.
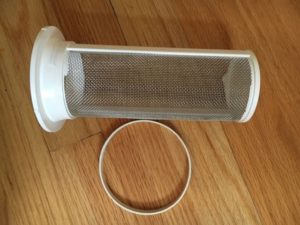
There is a small filter included with the First Flush system to keep the slow release control valve from clogging, but there is an additional option that can be purchased separately called the Stainless Steal Filter. This is shown in the picture titled “DIY Rainwater Collection System Extra Filter”. The other filter is still used, so you end up with two filters in the First flush system if you use this one. Since the slow release control valve is so important for this system to operate automatically, I will be using the extra filter on all of my systems.
You use a PVC pipe in the vertical section that is long or short based on the size of your roof. There are calculations and suggestions with the directions in the kit to help you figure out what size PVC to use.
Use What You Got
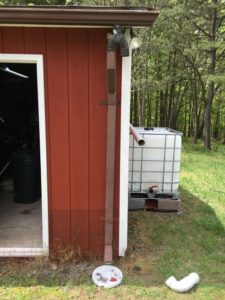
The completed systems are shown in the pictures below titled “DIY Rainwater Collection System Complete”.

Once you have water in your IBC tote, it is time to use it. You can use gravity feed or use a pump if you need more pressure or are going uphill. In either case, I put a ¾ in hose connection on the bottom of the system I was working on. I need a 2” PVC adapter that had a smooth end to glue on one side and threads on the other side.
Then I used a 2” to ¾ inch spigot thread bushing, with the 2” side being smooth and the ¾ inch side being threaded. Then I used a ¾ inch hose spigot and threaded it into the ¾ inch threaded bushing using plumbers tape. I glued the bushing to the PVC adapter and then screwed the PVC adapter onto the IBC tote spigot, using plumbers tape.
Now that I have an IBC tote with water and a hose spigot on it, I need to push the water up hill. In order to do that, we purchased a ½ HP pump from Amazon. The link for the one I got is below. There are many different types of pumps and you need to size your appropriately. Figure out how high (vertical) you need to push it and how much (GPH) you want to push. I made sure to get one that has standard hose fittings in and out so I can run a ¾ inch garden hose from the IBC tote to the pump and then another garden hose on the other side of the pump.
The Shopping List
IBC Tote: Craig’s List in the Farm+Garden category. (Food Grade)
The web site below seems to have a lot of different types of adapters for IBC totes, including both types of IBC tote valves.
As an Amazon Associate, I earn commission from qualifying purchases. There is no additional cost to you!
Want to Help Out a Small Business??
If you are local you can support our small business by buying plants at Great Escape Nursery . You can also help us by shopping on Amazon just by going through our storefront! As an Amazon Associate, I earn commission from qualifying purchases. There is no additional cost to you! Our storefront at Amazon is located at this link: https://www.amazon.com/shop/greatescapefarms. Buying from either location helps our business produce more content for you.
If you like this blog post and want to find out more about Great Escape Farms check out our Great Escape Farms Overview. Here you get an overview of all the wonderful stuff we are involved in. Also, sign up for our email list at the bottom of the linked page.
Great Escape Farms is now on Patreon! You can support us for as little as $1. If you enjoy our work and want to help support us, please check out our Patreon page at: https://www.patreon.com/gef.
Below is a YouTube video titled “DIY Rainwater Collection System” that shows the progress of the system described in this post.
Thanks for visiting the Educational DIY Rainwater Collection System – All You Need to Know post. Please give us your thoughts for DIY Rainwater Collection System by commenting below.
If you like plants check out Great Escape Nursery
Leave a Reply